The Bike Shoppe

The Bike Shoppe
Your Ogden Utah bike expert since 1976!

Thursday, October 26, 2017

Bike Packing: Bob's Lake

My latest bike packing adventure took me to Bob's Lake in the Uintas.  Here's how we got there:
  • Follow I-80 east past Evanston
  • Before reaching Bridger, take Exit 30 (Bigelow Road at the TA gas station)
  • Turn right onto 202 (202 turns into a dirt road) 
  • Follow 202 past some windmills on your left and a small energy plant 
  • Turn left onto 207 (shortly after energy plant) 
  • Follow 207 south for several miles until you intersect 204 (2014 creates a 'T' in the road)
  • Turn left onto 204 and follow several miles until you hit pavement 
  • Turn right onto 271 (immediately after dirt road converts to pavement)
  • Continue on  271 past Meek's Cabin Reservoir
  • 271 changes to FR065 past Meek's Cabin Reserviour
  • Cross the bridge over Blacks Fork River
  • Turn right onto FR064 (shortly after crossing bridge)
  • Follow FR064 to the trailhead
We drove on FR064 all the way to the trail head.  After entering the pines, the road starts to get pretty rough.  It's definitely drive-able, but you should have an off-road capable vehicle with some clearance to get there.  A Subaru outback wouldn't cut it.  You could definitely park at the pines and hike or ride in the last few miles to the trailhead.

We planned on a three-day, two-night stay.  I was able to comfortably pack all my food and gear into six dry bags holding a total of 70L.  I had two 5L Salsa Anything Cage Bags and Anything Cages on my fork legs, one 20L bag on my front rack, one 20L bag on the rear rack (top), and two 10L bags on the sides of the rear rack.  I carried a Camelbak Skyline on my back with my water and bike tools.  I've included some images of how it all packed down:


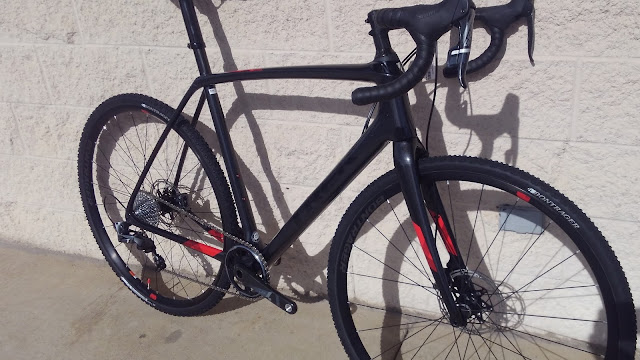
The Trek 1120 was amazing!  What a fun ride!  I'm 5'9" tall with goofy long legs and arms.  I usually ride an 18.5" Fuel EX.  This model isn't offered in an 18.5", so instead of going smaller I decided to go a bit bigger.  Bigger makes sense: more comfort with a higher front end and a bit more stability with the longer wheelbase.  I test rode the 17.5" before making my decision, and I felt like my weight was too far extended over the handlebar.  The 1120 comes stock with a front and rear rack installed.  The front rack securely cradles my 20L drybag.  With only two nylon straps, I was able to firmly secure the bag to where there was no shifting or readjusting.  The rear rack secured my other 20L bag just as easily.  The rear rack further includes two harnesses that will secure 10L bags to either side of the rear wheel.  the drybags slide in nicely, and with only a little effort, everything can be adjusted so there is no unwanted movement.  Everything stayed snug and secure for the duration of the trip with exception of one bolt that worked itself loose on the rear rack (nothing a little Loctite won't fix). 

I only made a few minor modifications to the stock bike:  I ended up swapping out the Chupacabra tires for some Maxxis Chronicles.  They offer a little more volume for the size (29X2.8), and they look really good.  I also installed a wider Bontrager Line Pro handlebar and a shorter Bontrager Line Pro stem.  I made this switch because I like the feel of a mountain bike cockpit for comfort and handling.  I was really happy with the results on the ride. 


The ride in was slow, but really pretty and actually quite fun.  I'm used to hiking these same trails, so I've gotten used to the amount of time it takes to span certain distances.  The bike definitely makes light work of the straightaways and meadows.  There were plenty of challenging areas too.  Of course, I like technical riding, so this was right up my alley; however, if you're not into the techy rough stuff, you may want to avoid this adventure.  Because we're single-track climbing over 10,000 feet, the challenges were plentiful, and the dead fall crossings were frequent.  There were only a few hike-a-bike sections though, and everything was ride-able on the descent which made getting out a breeze.  


We ran out of light and set up camp at 3.5 miles in.  There are plenty of nice areas to find a soft spot to pitch a tent and to make a small fire pit.  We set up about 100 yards off the trail nearest the river for easy access to water. 


The next morning we left our camp set up and took the bikes (now much lighter) up toward our goal of Bob's Lake (Tokewanna Peak was under a bit too much snow).  We had fun exploring the several cabin remains from 1920 loggers that line the trail.  We were able to ride the bikes another four miles and finally ditched them to hike the rest.  There was too much snow for the bikes, and the trail was getting tough to follow.  The hike was easy enough so long as we kept the river within ear-shot.  The toughest section of trail with the most elevation gain was the last 1.5 miles to the lake.  Bob's lake sits in a bowl just northwest of Tokewanna Peak near 11,500'.  Other than the wind, the temperature was really nice.  We were able to comfortably cook up a lunch of Raman Noodles and hot cocoa.  Scrumdidliumpcious. 


This area promises to be a perfect location for September camping.  Had we planned this just one month earlier, we could've summited Tokewanna (13,165').  If you like to get away from groups of people, and if you don't shy away from technical climbs, this trail is definitley worthy of your time.  Have a happy adventure!

Saturday, October 21, 2017

The BEST bike ever!

Just a few months ago, I sold the bike of my dreams.  It was a 2016 Trek Boone.  I had a really hard time buying one because it was such a popular bike, and quantities were waaaay limited.  With no small effort I ended up getting my hands on a coveted frameset.  I went to work pimping it out from axle to axle:
  • I chose the Ultegra Di2 road kit with a 50-34 crank and an 11-27 cassette.  I decided against Dura Ace because I planned to really test the Boone's limits.  I wanted to see how it handled all the rugged Northern Utah terrain at our fingertips -- on road, off-road, gravel, single-track, etc.  Anyway, I figured it'd be less painful to scratch up an Ultegra crank as opposed to DA.  I ran standard road gearing because it was also going to be my road steed, and I needed to be able to keep up.  
  • Ultegra hydraulic disc brakes (before they were a big deal)...never again will I use rim brakes!  They offer more stopping power, better modulation, and awesome performance in any weather conditions you dare to ride in.
  • Bontrager RXL FlatTop carbon road bar in a 44cm - two cm wider than I usually ride for off-road stability and a little more flex.  The FlatTop feature offered just a bit more width on the top of the bar too. 
  • Zipp 303 Firecrest clincher wheelset.  I converted them to tubeless...the only way to go!  I don't recall ever flatting on that bike.  I mounted two Bontrager CX-O 700X33 tires:  tubeless ready, light weight, and they roll really great while still offering enough tread for some off-road bite.  Today's trend would call for a bigger tire, and I'd jump on that bandwagon for sure, but where I used the bike for full-blown road rides the 33mm width was adequate on dirt while still fast on pavement.
  • Crank Brothers Egg Beater Ti pedals:  very light and small.  I needed a pedal that was really easy in and out in mud or snow that could hold up to pedal strikes.  There were times when some more platform support would've been nice, but all-in-all, I'd use the Egg Beaters again.  With a carbon sole and a Shoe Shield installed under the cleat, the platform was solid enough (unless you're a sprinter or a crazy hill-climber in which case you wouldn't be riding this bike). 
So now you have an idea of my dream bike, here's what I used it for:  EVERYTHING!  Really.  I rode my Boone everywhere you can imagine:  Stan's trails, Rattlesnake, Coldwater, Cougar-kill and the entire East Bench including Beus, just about everywhere at SnowBasin including Ice Box and Wheelers, and then thousands of miles on the road.  One cool memory comes from a road ride with Matt.  He and I planned on meeting at the base of the North Ogden Divide early one morning, ride around Pineview, up Old SnowBasin Road, down Trappers, then out Weber Canyon.  I slept through my alarm, so I texted Matt to go on ahead claiming I'd try to catch up.  I was about 30 minutes behind when he started up Old SnowBasin Road.  I decided to try short-cutting up a dirt trail (Wheelers).  I pointed my bike off-road, climbed Wheelers, passed several impressed mountain bikers, and popped out at East Fork just as Matt was passing on the road.  Perfect timing!  It turned out to be an awesome ride, and I became more enamored with the Boone than ever before.


 My main use for the Boone was commuting.  I live in Plain City and commute to work to South Ogden.  My fastest route was 16 miles that cut through the city using the Ogden River Parkway.  A funner (but more technical) route led me up above Weber High to a Pleasant View trailhead, along the trail system through North Ogden and the East Bench, and finally down Beus.  Definitely a full-body workout!  This is where the versatility of the Boone truly blew me away.  Wherever I had the notion to ride, I didn't have to hesitate...the Boone would handle whatever I threw at it.

Some of my craziest rides were in the Spring when the Ogden and Weber rivers flood over their banks and submerge the Parkway trails.  I got soaked and dang near had to swim a time or two, but I always made it across.  I learned something awesome about Di2:  if you plug all the junction ports, it's 100% waterproof.  I tested its waterproof capabilities over and over and it never let me down.  Perfect shifting all the time, dry or submerged, with ZERO adjustments!

Owning this bike has made me crave adventures on bikes.  I loved every minute of our rides together.  I've bought and sold countless bikes, but this one actually hurt when I watched her roll out the door with someone else.  Hopefully it leads to just as many adventures for him.  On the bright side, Trek has rolled out an all-new Boone.  It rides smoother with front and rear IsoSpeed; the handling is more predictable with front and rear thru axles; there's more frame clearance for bigger tires; and it's stunningly sleek and beautiful with 100% internal electronic and cable routing.  Sign me up!
Trek Boone 7

I love the design on the top tube.
Trek 2018 Boone 7 in all her glory.


Front IsoSpeed creates an incredibly smooth front end  by allowing the steerer tube to flex without any lateral movement.  This keeps the handling predictable and precise.
Front and rear through axles are noticeably stiffer and handle great off-road.
Rear IsoSpeed adds vertical compliance to smooth the rough gravel roads.
Trek's Control Freak internal cable routing is the cleanest out there. 
A section of the downtube is removable for clean, easy access to the battery on Di2 systems.

Wednesday, January 18, 2017

What Every Fatbiker NEEDS


Here we are at week two of reviewing what every fatbiker needs.  Since last post, I've been able to get out on the bike four more times.  It's been really cold these past few mornings.  This morning, as I was descending down Eastfork (after a long, sweaty climb), I ran into two moose hogging the trail.  They refused to move, and I wasn't about to climb all the way back up, so I ended up following them about a mile down to Old Snowbasin Road.  Once I stopped moving, I started getting cold pretty quick.
Cycling gear works like that.  If you're sitting in the cold doing nothing, you'll freeze; but when you're exercising, the minimalist clothing will keep you warm and regulate temperatures so you don't get too hot and sweaty.  Needless to say, as I was sitting around waiting for the moose, I got pretty chilled...except for my feet. 
I chose to invest in some winter cycling boots a few years back, and I'm pretty happy I did.  Before that, I tried regular snow boots, hiking boots, and cycling shoes with thermal shoe covers.  Snow boots keep you warm, but are far too bulky and heavy to be practical.  I ditched those pretty quick.
Hiking boots are a bit chilly, but much lighter and pedal-friendly than snow boots.  My biggest issue with them was snow getting inside.  If you ever put your foot down in snow deeper than your ankle (and you will), you get snow in the shoe.  Be ready to welcome wet, cold feet. 
I found the most success running regular cycling shoes with a heavy duty shoe cover.  My feet stayed fairly warm, and I could clip in and pedal without restrictions.  The problems came anytime I had to hike the bike.  The nose of my shoe cover would peel back and pull up and over the toe of my shoe filling with snow and exposing my shoe.  This not only stretched out my shoe covers, it proved to be pretty miserable once my toes started freezing.  So, after trying everything else, I finally decided to give the cycling boots a try. 
There are a lot of awesome brands out there.  At the Shoppe, we've sold Lake, 45Nrth, Louis Garneau, and Bontrager.  After some studying, I decided to give the Bontrager Old Man Winter boots a shot.  I know they're expensive.  $300 is a lot to pay for a pair of cycling boots you'll only be using four months out of the season.  However, compared to many other brands on the market, $300 is not a bad buy, especially considering the quality of the boots and the features.  So let's talk features.  Bontrager have done an awesome job keeping these boots simple and easy.  They have really practical features with lust-worthy benefits, but aren't loaded down with gadgets like some of the 'Swiss Army'-type boots out there. 

First, look at the insert bootie:  Bontrager made the insulated portion of the boot a removable insert.  It uses a comfortable fleece lining with a healthy 200g 3M Thinsulate insulation.  The bootie fully opens up then snugs tight with an easy draw-string and cinch.  There's a convenient loop at the back for quickly pulling it over your heel and onto your foot.  After the insert is snugly fitted, you can effortlessly slide your foot into the boot. 
The heel-portion of the insert is wrapped in non-slip material that prevents the heel from slipping when walking or riding...and it works! 
Water problems?  If you ever manage to get the shoes wet with water or sweat, the insoles are removeable from the bootie, so air drying is a breeze. 

Now the boot:  I like simple.  It's nice when things do what they're designed to do without being complicated by useless gadgets and add-ons.  Bontrager nailed it on the head with this design.  The front fully opens up with a zipper.  Once open, it slides easily over the bootie and is tightened with two sturdy velcro straps.  One thing that bugs me about winter riding is the time wasted putting on all that cold-weather gear.  But with Old Man Winters, anyone could gear themselves up in a snap even while wearing full winter gear and gloves.
The boot extends about 9" from the sole, so it's plenty tall for the hike-a-bike situations without being cumbersome or restricting.  If you find yourself post-holing out in the deep stuff, the top of the boot tightens with an elastic draw string that can be pulled taught and locked with one hand. 
They've used a fully waterproof, 4-way stretch upper protected by a durable 'GnarGard' shield wrapping the toe box and lower sides prone to brush and rock strikes. 
The Vibram sole is meaty for traction, but avoids the extra bulk many other boots carry.  I've had no issues with the boots rubbing my cranks or striking my chain or seat stays, but I've had no shortage of traction marching up steep, slick slopes.  They hook up nicely on a good pair of platform pedals, but work well with a clip-in system too.  I've chosen to run clipless (Crank Brothers) because they give me a little more room when the trails are narrow and deep, and I've never had issues clipping in or out...even in snow.   The clipless also makes them much more practical when commuting on my cross bike.  Speaking of commuting, the back-side of the boots have a velcro strap designed to hold a flashing tail light for increased visibility on moving parts.  The Bontrager Ember fits nicely here.


All-in-all, these are excellent boots, and in my opinion, well worth the investment.   You should take a minute to stop by and check them out.  I promise, they'll make your winter fatbike adventures much more comfortable. 


Thursday, January 12, 2017

re-CYCLE!


Do you have a lonely, neglected bike gathering dust sitting in your garage?  Why not put it to good use by giving it to someone who could really use it?  The Bike Shoppe is teaming up with the Ogden Bicycle Collective to gather, refurbish, and donate used bikes to people in need. All donated bikes will be thoroughly inspected and tuned before being carefully placed with a qualified individual in need.  
If you don't have a bike but would still like to help, we're also collecting non-perishable food items to donate to The Lantern House in Ogden. 
Please help us out.  It's the little things that make the biggest difference. 
Donations can be dropped off at The Bike Shoppe during business hours now thru Monday, January 16.  Monday we will extend our hours to 7:00pm. 
Thank you so much for your generosity!

Saturday, January 7, 2017

What Every Fatbiker Needs


Saturday morning I decided to get up early and take the fatbike up on the BST.  I started at Rainbow Gardens and headed south toward Malans.  As I was pedaling up the trail, I started thinking about all the awesome gear I had that made fatbiking not only possible, but actually enjoyable. 
I think snow conditions are best when it's really cold...anything under 10 degrees seems just right.  When you're out exploring in sub-zero temps, it's pretty important to be prepared.  I didn't start out with everything...I used what I had, and I had fun.  But I've gradually begun adding to my cold-weather collection, and with each addition, I've really been able to appreciate the differences between regular snow gear and cycling-specific gear. 
Each week I'm going to highlight a different piece of equipment that I think is a must-have for fatbikers.  This week:  pogies
It took me two seasons of miserable glove swapping to finally bite the bullet and buy some pogies.  I decided to go with Bar Mitts brand Extreme Mountain, and so far, I'm super happy I did.  I used to always pack two pairs of gloves on every ride:  one for the way up, and one for the way down.  Going up my hands get sweaty, the gloves get wet, then they'll freeze solid on descent.  My hands get cold easily, so putting on a cold pair of gloves mid-ride right before a big descent always left my hands cold and numb on the way down. 
The Bar Mitts are honestly the perfect solution.  I can wear a lighter winter glove that still allows a comfortable amount of dexterity without my hands ever getting sweaty or cold. They're a simple, install-in-minutes design made out of tough neoprene.  The Extreme Mountain version installs with handlebar plugs that tighten with a 4mm allen key.  I'm a big fan of the plugs as they keep the mitts more securely anchored to the bar. The mitts have vents on the side and a removable top skirt that hugs your wrists to control the temperature.  If you start getting sweaty, open them up and allow some air flow.  When you're cold, close them off and they warm up quick. 
Another unexpected benefit is the improved braking and shifting performance when I'm using pogies.  If you're like me and like to get out when it's really frigid, you'll know that brakes and shifters stop functioning properly once they get too cold.  Pogies completely cover your hands, shifters, and brake levers keeping everything at a higher temperature.  It may seem like a stretch, but I've not had a single issue since I made the switch. 
If you're out there suffering along without pogies, please stop by and grab pair.  I promise, you'll be happy you did. 

Monday, January 2, 2017

My New Unexpected Passion

To state the obvious, I love biking.  I've never branched out too much to other types of sports.  I'll go hiking occasionally, and usually I'll get out on a few back-packing trips each year, but I'm always looking for spare time to get out on my bike.
Winter used to put a huge damper on my lifestyle because it was so hard to get out on the bike.  I used to swap to studded snow tires and get out every once in a while, but I really couldn't get up into the mountains much unless the trails were packed down to almost icy.  Then came the amazing fatbike.  This opened up so many amazing opportunities to get out and ride.  Last season (lots of snow and really cold), I rode up at Snowbasin 2-3 times each week.  It was the first winter I had really put some regular hours on a fatbike...and I loved it!
But even with the super-versatile fatbike, I find that the quality of my ride is hopelessly tied to snow conditions.  For example, yesterday snowed 8"+.  Tomorrow we're expecting another dumping.  You can't ride in that much new snow, and it's not enough time to get trails packed down, so biking-wise, I'm out of luck.  Enter new passion: SNOWSHOING!  In the past, I never put much thought into snowshoing.  it seemed to slow and laborious to ever really call it fun.  But boy, was I wrong.  Not only is it an amazing workout, but it's dang fun!  I've yet to get out on the mountain with a pair of snowshoes and not have a  great adventure.  I can climb up above the inversion, see amazing views that make the same trail I've explored hundreds of times beautifully different, jump off cornices, and blaze my own path wherever I want to go.  So when I can't ride, I strap on a pair of trusty snowshoes, and I get to making trails to eventually ride on.  Give it a try!  It's guaranteed to make Winter fly by and get rid of the blues.  If you don't have a pair, we rent out awesome snowshoes and poles.  So reserve a pair and start planning your next adventure now!